|
|
|
|
|
 |
VPN Client Installation For Windows XP (Manual Install)
The installation procedure assumes that you have the following:
- You are connected to the Internet via an Ethernet adapter or have a supported modem installed.
- TCP/IP is installed.
- You have an account with an Internet Service Provider (ISP).
- You have read and agreed with the Usage Restrictions for the VPN service.
1. Log on to your Windows XP computer as Administrator or a user with administrator privileges.
2. Open the Start Menu and select the Control Panel option.
3. Once Control Panel is open choose the Network and Internet Connection option.

4. Double-click the Create a connection to the network at your workplace option, this will start the New Connection Wizard.

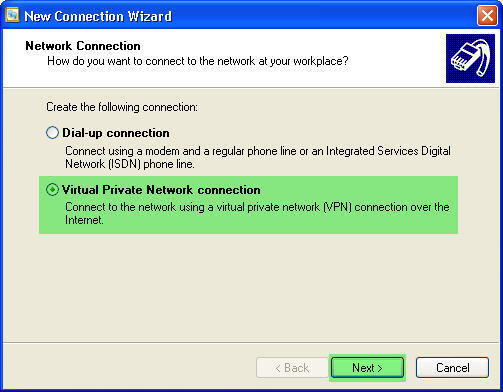
5. Once the New Connection Wizard launches, select the Virtual Private Network connection option and hit the Next button.
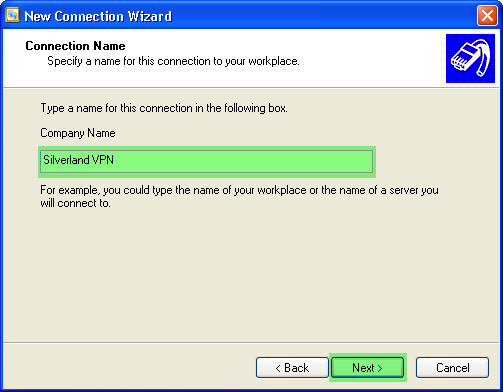
6. Enter Silverland VPN for the Connection Name and click Next.
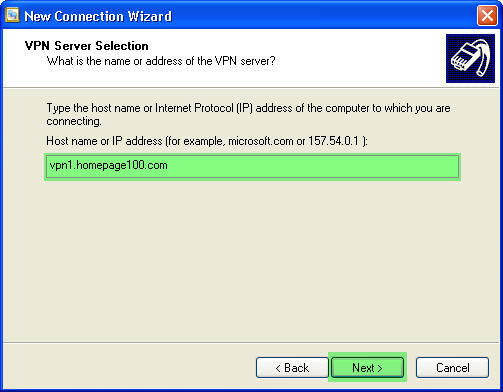
7. Enter vpn1.homepage100.com for the VPN Server Selection and click Next.
8. Now that the main details of the connection have been entered. Check the Add a shortcut to this connection to my desktop checkbox to make it easy to find and click Finish.

You will now find a Silverland VPN icon on your desktop.
9. Double-click the Silverland VPN icon. Before connecting there are a few extra changes that needs to be made so click the Properties button.

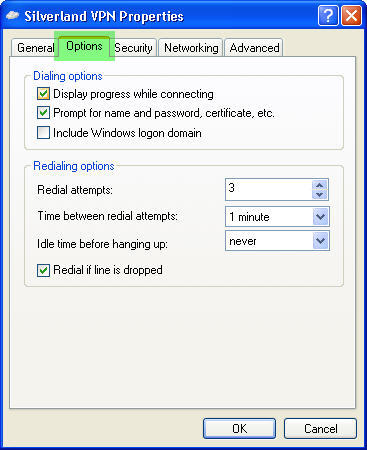
10. From the Properties dialog click on the Options tab. Because the Internet is sometimes slow and unresponsive it is possible that the connection to the VPN service will be lost from time to time. If you are connected to the Internet via a LAN connection you may also wish is tick the Redial if line is dropped option. Next click on the Networking tab.
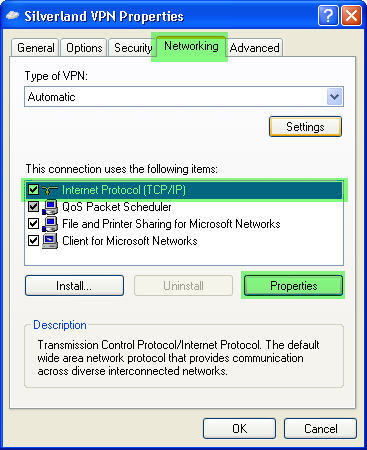
11. From the Networking tab, make sure Internet Protocol (TCP/IP) is highlighted and click Properties.
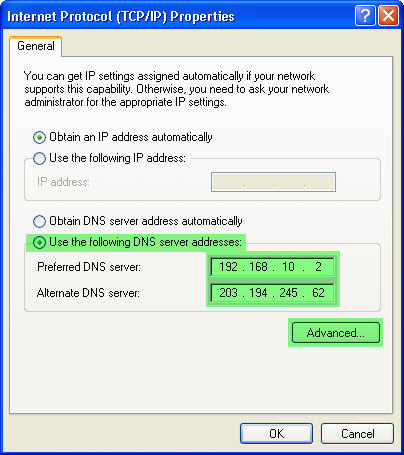
12. In the Internet Protocol (TCP/IP) Properties window, select Use the following DNS server addresses and enter 192.168.10.2 for the Preferred DNS server and 202.64.37.166 for the Alternate DNS server. Next click the Advanced... button.
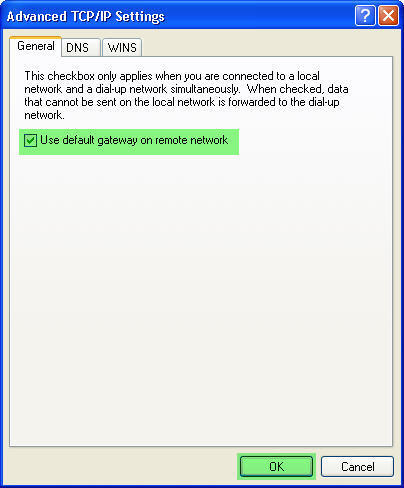
13. In the General tab under the Advanced TCP/IP Settings window, make sure Use default gateway on remote network is checked. If this is not checked, all internet traffic from your computer will not route through our VPN server. Next click OK. Click OK again for the Internet Protocol (TCP/IP) Properties window and finally OK for the Silverland VPN Properties window.
14. Finally you will need to fill-in your User name and Password. Now click Connect.
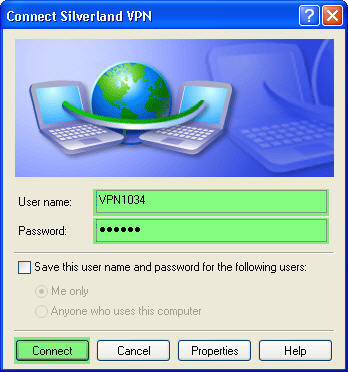
Note: If you are using your own computer and wish to save the user name and password for subsequent connections, check Save this user name and password for the following users. However, if you are using a public computer, we STRONGLY advise you NOT to check this option as other users will be able to gain access to your VPN account.
15. Once you've successfully connected to our VPN Service you will see a network icon in the taskbar.

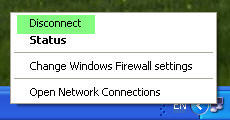
To disconnect from our VPN service at any time simply Right Click on the network icon in the taskbar and choose the Disconnect option.
Troubleshooting / FAQ:
We have gathered a list of known issues and problems associated with the VPN
alternatively you can e-mail our Support Desk
Click here to obtain a PDF version of this documentation. |
|
|
|
|
|
|
|
|
|
|
|
|
|
|